Greg's Dark Blue 911 - Hacks
Autothority Chip Installation
I am not responsible for any problems you experience
as a result of trying to do anything described here. The hack documented
here worked fine for me but may not work for you far any number of reasons.
--> This chip is currently for sale! <--
I decided to install the
Autothority
chip to try to sqeeze out a little bit more power out of my 911. This car
already has some exhaust modifications to make it more free flowing, but
like it always is with speed, you can never have enough.
The Autothority chip claims a 16BHP increase in the 3.2L US spec engine.
Although I didn't do a dyno test before and after, I can tell that there
is a little bit of improvement. The butt-dyno says that there is some
significant improvement below 4,000 RPMs, and a smaller improvement at
higher RPMs. I didn't test the higher rev limiter, nor do I plan to do
it deliberately. I've heard others describe the improvement as "waking up
the car", and I have to say that's pretty accurate. I might go back at
some point and do a
dyno test to see if there is anything close to the claimed performance
improvement.
Was it worth the extra price over the Weltmeister? I guess I'll never know.
Before beginning this hack yourself, you will need the following items:
- Autothority Performance E-Proms part# POR.01.911.300
- 10mm socket, socket wrench, and a variety of extenders
- Flat blade screwdriver
- Sharp knife
- Needle-nose pliers, for picking up things that fall in annoying places.
- A tank full of 92 octane gasoline.
Some people have suggested removing the driver's seat to make it easier
to get to the Motronic box (where the chip goes). I tried to do this, but
one of the bolts that holds the seat in just wouldn't budge and I was
afraid I was going to strip the bolt. I then poked around and found that
the 4 nuts that hold the Motronic box were pretty easy to get to with the
seat in all the way back, and raised, if you have that feature.
| Click on thumbnail to view full-size image |
|---|
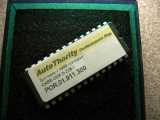
Here is the chip as shipped. The chip came with instructions from Autothority. READ THEM! I will not repeat most of what is in there. |
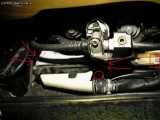
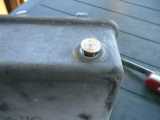
When you lift back the carpeting per the instructions, you will see the bundle of cables and the Motronic unit. The arrows show the location of the 4 nuts that hold the Motronic, the circle shows the location of retaining clip that holds the connector, and the box shows the location of the bolt that holds the wire bundle. |

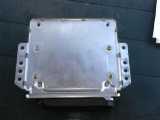
Unbolt the relay to make it easier to remove the Motronic, then remove the retaining strap and finally the unit itself per the instructions. |
Per the instructionsn bend the tabs on the bottom. I used the knife to pry them up enough to get the screwdriver under them. |
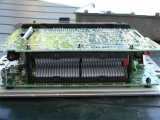
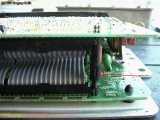
Here you see the two circuit boards and the ribbon cable. |
Here is where you separate the posts with the screwdriver. Remember to do both. |
The instructions don't mention it, but there are two clips at the top of this picture. Press down in the slots with a screwdriver and gently pull the motherboard out. |
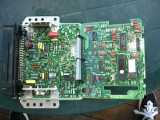
Finally you can unfold the two circuit boards flat. The chip you are replacing is on the far right. |
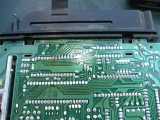
Here is the original chip on my board. Your mileage may vary. |

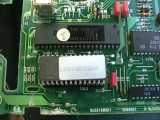
Here I'm about to slide the new chip in. Make sure the notch aligns with the notch on the socket and the pins all align with the holes. Gently press down. Do not force it. |
Put it all back together in reverse order. I needed to pop this out temporarily to get the cover to go back on, then replaced it later. |
When you're done, double and triple-check everything. Turn the key and hope
it starts! Remember, refer to the instructions included with the chip. I'm
providing this web site to add some pictures to the instructions provided
by Autothority and help point out some tips to make the process easier.
Did it do any good?
I'm still trying to find out. Nobody has been able to show any proof that
it makes a big difference. Seat of the pants it feels faster but then again
after spending this much money my subconcious could be causing that.
To find out for sure I'm going to do several 0-60 runs with the old chip
and the Autothority chip to find out for sure.
| Date |
Chip |
Best/Avg |
| 7/10/2000 |
Autothority |
6.83 / 6.95 |
Please send any comments, suggestions, corrections, etc. to me at
greg@gulik.org.
)
)
)
)
)
)
)
)
)
)
)